Greater Midwest Foodways Alliance
FAMILY HEIRLOOM RECIPES
Contestants entered their best scratch family heirloom recipe suitable for a family or community dinner. Recipe should originate before 1950.
Contestants brought a prepared dish along with a brief story of who passed the recipe down to them, ethnicity, if relevant, number of years the recipe has been in their family and any interesting information about their recipe.
JUDGING CRITERIA
Taste: 50%
History: 40%
Appearance: 10%
Premiums sponsored in partnership with The Spice House:
1st place – $150., 2nd place – $100., 3rd place – $50

Pampered Chef is sponsoring additional prizes for our winners:
First place: Reversible Bamboo Carving Board (Value = $72)
Second place: Cool & Serve Square Tray, Outdoor Mini Spoons & Tongs Set (Value = $49)
Third place: Food Chopper (Value = $31)
Competition was conducted on August 5th, these are the results:
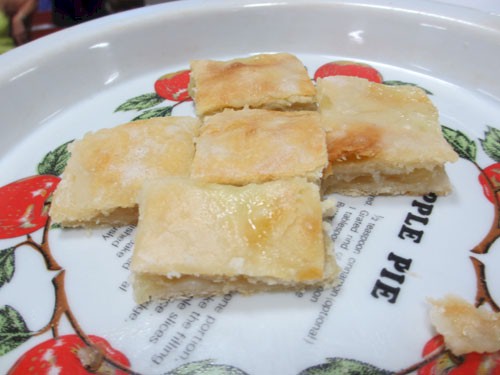
Apple Slice (image by Catherine Lambrecht)
Apple Slices
Kathleen A. Borchardt, Oak Creek, Wisconsin
A Tale of Two Great-Grandmothers Who Loved To Bake
Two of my great grandmothers loved to bake. My great grandma Lydia lovingly hand-wrote her favorite recipes into a recipe book; some that she had created and some collected from friends and family. She wrote 5 copies of this recipe book, 1 for each of her grandchildren. I now have my mother’s.
The other great grandmother, Erma, married an apple grower. This recipe was created and made for farm threshing times. Farmers would help each other harvest crops and when these apple slices were made and shared with others they were a hit! After the two families came together this favorite recipe was added to Lydia’s recipe book.
Erma and Henry Mahr had two children, including Henry Jr, my grandfather. He stayed on the farm; where he raised his family and continued on with the apple growing tradition. (I can still taste the cider he made from those apples and have never been able to find cider anywhere that even comes close.) My grandmother, his wife Violet also continued the tradition of baking the apple slices for anyone who ventured onto the farm during apple season, including me! She even demonstrated the recipe on TV’s Dialing for Dollars almost 50 years ago.
My mother continued to bake them after my grandmother passed away and since I have received the treasured recipe book. I too began to make the apple slices. The first time I made them I thought for sure they wouldn’t be quite how I remembered. I know how recipes that get passed down go; everyone tweaks it a little so the food you remember never turns out exactly the same when you make it yourself. But when I took a bite of my first batch of apple slices it was exactly how I remembered them. It took me back to sitting in my grandmother’s kitchen waiting for the fresh batch to come out of the oven so we could frost them and then the best part, eat them! I have already made a batch with my young Goddaughter and so I hope the recipe will continue to be passed down for many years to come.
Apple Slices
Kathleen A. Borchardt, Oak Creek, Wisconsin
Crust:
2 cups self-rising flour
1/4 tsp. salt
2/3 cup butter
1 egg yolk, beaten
1/2 cup milk
Filling:
5 cups apples, sliced
1 cup sugar
2 tbs. flour
3 drops peppermint flavoring
Glaze:
1/2 cup powdered sugar
2 tbs. milk, to thin
2 tbs. butter, melted
Directions:
Mix crust like pie dough cutting the butter into flour. Mix beaten yolk and together and stir into floured mixture. Roll out 1/2 the dough, put into greased 15-1/2 x 10-1/2 inch pan, with dough extending to the sides.
Cook apples with flour and sugar, about 5 minutes. Add peppermint flavoring. Set aside to cool slightly. Pour onto layer of dough in pan.
Roll out other half of dough and cover apple mixture. Seal the edges. Brush with remaining egg white.
Bake at 375 degrees for 40 minutes. While baking mix glaze ingredients. Glaze while still warm.
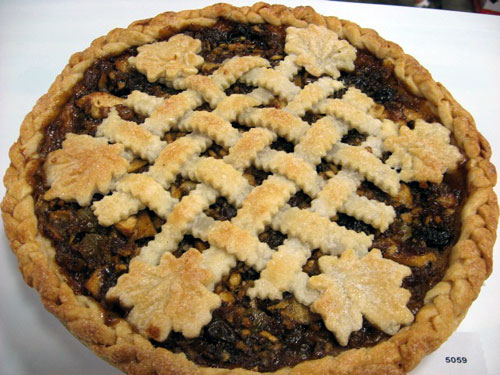
Mincemeat Pie (image by Ronnie Hess)
Heritage Mincemeat Pie
Beth Campbell, Belleville, Wisconsin
THE HISTORY OF MINCEMEAT
Mincemeat developed as a way of preserving meat without salting or smoking some 500 years ago in England, where mince pies are still considered an essential accompaniment to holiday dinners just like the traditional plum pudding. This pie is a remnant of a medieval tradition of spiced meat dishes that have survived because of its association with Christmas. This pies have also been known as Christmas Pies. Mince pie as part of the Christmas table had long been an English custom.
Today, we are accustomed to eating mince pie as a dessert, but actually “minced” pie and its follow-up “mincemeat pie” began as a main course dish with more meat than fruit (a mixture of meat, dried fruits, and spices). As fruits and spices became more plentiful in the 17th century, the spiciness of the pies increased accordingly.
11th Century – The Christmas pie came about at the time when the Crusaders were returning from the Holy land. They brought home a variety of oriental spices. It was important to add three spices (cinnamon, cloves and nutmeg) for the three gifts given to the Christ child by the Magi. In honor of the birth of the Savior, the mince pie was originally made in an oblong casings (coffin or cradle shaped), with a place for the Christ Child to be placed on top. The baby was removed by the children and the manger (pie) was eaten In celebration. These pies were not very large, and it was thought lucky to eat one mince pie on each of the twelve days of Christmas (ending with Epiphany, the 6th of January).
Over the years, the pies grew smaller, the shape of the pie was gradually changed from oblong to round, and the meat content was gradually reduced until the pies were simply filled with a mixture of suet, spices and dried fruit, previously steeped in brandy. This filling was put into little pastry cases that were covered with pastry lids and then baked in an oven. Essentially, this is today’s English mince pie.
1413 – King Henry V of England served a mincemeat pie at his coronation in 1413. King Henry VIII liked his Christmas pie to be a main-dish pie filled with mincemeat.
1657 – Oliver Cromwell (1599-1658), the self-proclaimed Lord Protector of England from 1649 until 1658, detested Christmas as a pagan holiday and his council abolished Christmas on December 22, 1657. In London, soldiers were ordered to go round the streets and take, by force if necessary, food being cooked for a Christmas celebration. Cromwell considered pies as a guilty, forbidden pleasure. Those celebrating It were fined. The traditional mincemeat pie was banned. King Charles II (1630-1685) restored Christmas when he ascended the throne in 1660.
1853 – Quaker Elizabeth Ellicott Lea explained in her book called Domestic Cookery that was published in 1853:
“Where persons have a large family, and workmen on a farm, these pies are very useful.” By useful, she meant that the pies could be baked in large numbers, and more importantly, during cold weather, they could be kept for as long as two months. The mincemeat could be made ahead and kept even longer.
Mince Pie Traditions
• Mince pie is a favorite of Father Christmas (Santa), so children should leave a plate of pie at the foot of the chimney.
• Only stir the mincemeat mixture clockwise because stirring it counterclockwise is bad luck for the upcoming year.
• While eating the first mince pie of the season, it’s traditional to make a wish.
• Always eat mince pies in silence.
• Eating a mince pie each day of the 12 days of Christmas is good luck for the upcoming year.
• Mince pies should have a star on top, depicting the Christmas star that led the Magi and Shepherds to baby Jesus.
Heritage Mincemeat Pie
Beth Campbell, Belleville, Wisconsin
Very Old Mincemeat Recipe Ingredients:
8 pounds beef stew meat
2 pounds suet
12 pounds chopped apples
2 pounds raisins
1 tablespoon allspice
1 tablespoon cloves
1 pound chopped citron
3 pounds brown sugar
1 lemon
1 tablespoon cinnamon
2 tablespoons salt boiled cider
In a large pot, simmer the unsalted meat until very tender. Cool the meat and then run through a food grinder twice.
Place the ground meat back into the pot with the same water.(most of the water will be boiled down) Add all other ingredients to the pot and add enough boiled cider so the mixture is moistened well, but not too wet. Simmer and stir until the apples are cooked-takes about an hour. Seal in sterilized jars while still hot.
The above recipe comes from the 1907 Ladies Aid Cookbook.
Some of our church members still make and can this mincemeat and sell it at our annual church bazaar. The following is the recipe that I have chosen for the Heritage Recipe contest. I chose it not only for the heritage and history that make it special but also because the Spice House is sponsoring this contest and I think it is a wonderful recipe to highlight the many spices that they have there.
Heritage Mincemeat Pie
PIE CRUST
1 C. FLOUR
1/2 C. SHORTENING
1/4 C. COLD WATER
1/8 tsp. SALT
MINCEMEAT FILUNG:
1 PINT OF CANNED MINCEMEAT
3 MEDIUM APPLES (1 CHOPPED AND THE OTHER TWO SLICED THINLY)
1/2 CUP OF GOLDEN PLUMPED RAISINS
CUT THE SHORTENING INTO THE FLOUR UNTIL PEA SIZE AND THEN ADD THE COLD WATER (that you have dissolved the salt in for even distribution) UNTIL THE DOUGH FORMS A BALL. REFRIGERATE OVERNIGHT OR UNTIL COLD.
ROLL THE CHILLED CRUST OUT ON A FLOURED SURFACE INTO A 10 INCH DIAMETER AND PLACE IN THE 9 INCH PIE PAN.
Combine the pint of canned mincemeat and add 3 medium apples (1 apple chopped and the other two sliced) along with 1/2 cup of plumped golden raisins. (To plump raisins let 1/2 cup of raisins sit In 1/4 cup of hot water and microwave for about 3-4 minutes. Pour off any excess water and add to your recipe). Pour Into pie pan lined with unbaked crust, cover with second lattice crust of if using a complete crust, seal and cut a couple of vents in the top crust.
BAKE YOUR PIE AT 350 DEGREES FOR 60 MINUTES OR UNTIL THE CRUST GETS LIGHTLY BROWNED. YIELD- 9 INCH PIE.
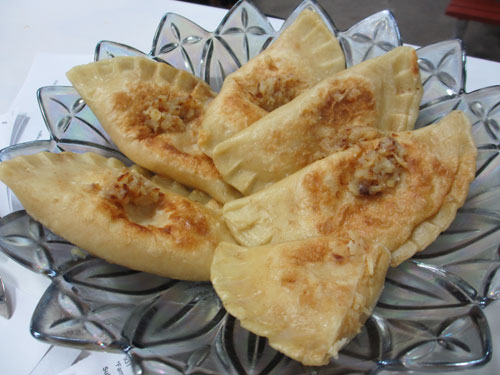
Pierogi (image by Catherine Lambrecht)
Polish Potato Pierogis
Lois J. Trongard, Pewaukee, Wisconsin
Recipe History (Pre 1900’S)
This recipe originally came over from Poland with my Grandfather. His mother taught all her children how to cook. It was important to her that the children learn how to make Polish food. When my grandfather came to America as a young man, he came with his rich history and some great polish food recipes. The recipe at the time did not have exact measurements. Like many recipes at the time that were passed down though families, family members learned through making the food. Many recipes, this one included were eventually written down with terms such as a pinch of this, two fistfuls of another ingredient, etc.
When my grandfather met and married my grandmother, he expected her to learn how to make pierogi’s so any children they might have would eat authentic Polish food. My grandmother was the first person to start to put more exact measurements to this recipe in order to enable family members to make the recipe.
My father was born and raised in Pennsylvania and met my mother in Milwaukee while in the Navy stationed at the Great Lakes. When he married my mother, my grandmother moved from Pennsylvania to live with them. She brought many wonderful recipes with her including this one for pierogi’s. My grandmother taught my mother how to make them.
As a child, I loved when my mother made these cheesy potato pies. She also made pierogis filled with sauerkraut, which as a child I didn’t but love now. Being a noodle filled with cheese and potatoes, the taste is not too strong for a young child’s palate, which is why they were so popular in our home growing up. As a teenager, I started to cook and bake so pierogi’s were one of the first recipes my mother taught my sister and me how to make. Over the years the recipe has been modified to use different cheese and to include garlic and sauteed onions in the filling but they are as wonderful today as they were over 100 years ago. Today I have taught all three of my children how to make pierogis and I now make these same pierogis for my grandchildren.
I truly believe this rich heritage was the catalyst for my love of the culinary arts.
Polish Potato Pierogis
Lois J. Trongard, Pewaukee, Wisconsin
Filling:
2 1/2 lbs. potatoes, peeled and cubed(about 5 medium)
1/4 cup butter (1/2 stick)
1 onion, chopped
2 garlic cloves, minced
1 1/2 teaspoon seasoning salt
1 lb. cheddar cheese, shredded
Dough:
6 cups flour
1 teaspoon salt
3 eggs, lightly beaten
1 1/2 cups water
Additional Ingredients:
3/4 cup butter (for frying pierogi’s)
1/2-cup butter
1 cup chopped onions
Boil potatoes until tender but still firm, about 15 minutes. Drain potatoes and mash in a large bowl. Separately, saute onion and garlic in butter until tender.
Mix onion mixture with mashed potatoes and add cheese and salt. Mix until thoroughly combined.
For dough, combine flour and salt in a large bowl. Mix in eggs and water.
Turn onto a floured surface and knead for 5 minutes or until smooth, adding more water as needed.
Roll out dough to 1/8 inch thickness. Cut into 5-inch circles, using a bowl as a guide. Place about 3 tablespoons of filling in center, fold over, and press edges with the fork tines for an attractive seal.
Place pierogis, a few at a time, into a large pot of boiling water and cook for about 6 minutes until they float to the top. Drain on a clean toweL At this point you can place on a baking sheet and freeze for future use. To eat immediately saute pierogi’s in 1/4 cup butter in a large frying pan. This will need to be done in batches. While the pierogi’s are frying saute 1 stick, butter (1/2 cup) with a cup of chopped onions in a separate saucepan. Saute until onions are caramelized. To serve place 2 to 4 pierogi’s on a plate and place some of the onion butter mixture over the top of the pierogi’s. Salt & pepper to taste.
Makes 20 pierogis.
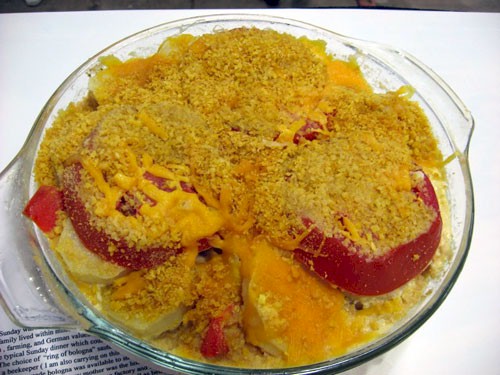
Tante’s Potatoes (image by Ronnie Hess)
Tante’s Potatoes
Elaine Mason, Oconomowoc, WI
When I was growing up in WI, Sunday was not an errand, shopping, or cleaning day. It was a day for church, family, and food. Extended family lived within miles of each other and spent the day after a hearty meal reflecting on the Depression, fanning, and German values.
This heirloom recipe reflects the typical Sunday dinner which could be “stretched” for hearty appetites or more family “dropping” in. The choice of “ring of bologna” sauteed in honey again reflects using what was available. My father was a beekeeper ( I am also carrying on this tradition) which insured fresh comb honey on the kitchen table. The homemade bologna was available to stretch that once a month paycheck budget since my father was the “bread winner” while my mother was the homemaker. Fresh cheese/cream was a staple since my Uncle “shipped” milk to the local cheese factory and in return received products which he shared with the family. Garden produce was used for meals as well as being a mandatory task for “canning” the winter supply of food. The spices of bay leafs and garlic were luxuries, but yet staples since they were essential in the “pickling” process. Cornflakes were used in place of breadcrumbs. Again, the “Depression”Era was symbolized by ”using up ” the crumbs left in that precious cereal box which were also used in cornflake cookies known as cherry winks. Typically, the meal would be heavy in starches of fresh bread and a dessert of a torte such as “schaum torte or coffeecake known as a kuchen. The day would end with multiple games of the card game called “sheepshead.”
Enjoy this heirloom recipe!!!
Tante’s Potatoes
Elaine Mason, Oconomowoc, WI
1 lb. WI potatoes peeled & cut into 1 inch slices
3 egg yolks
3 T WI clover honey (my own honey)
1 ring of bologna sliced
1 1/2 c. WI milk
1 1/2 c. WI heavy cream
3 minced garlic cloves
2 bay leafs
1/2 tsp. nutmeg
1 tsp. pepper
1/2 tsp. salt
2 T WI butter
1 chopped WI bell pepper
1 chopped WI onion
1 WI tomatoe sliced
2 c. crushed cornflakes
1 1/2 c. shredded WI brick cheese
1/2 c. shredded WI cheddar cheese
Preheat oven to 350 degrees.
In a greased 2 quart casserole place 1 1/2 c. cornflakes. Set aside.
In a medium skillet saute onions and peppers in 1 T butter till carmelized. Set aside. (May be done ahead.)
In same skillet saute ring of bologna in 1 T butter and honey till lightly brown. Set aside. (May be done ahead.)
In small bowl whisk egg yolks with 1/2 c. milk till smooth.
In a saucepan blend cream, rest of milk, garlic, nutmeg, pepper, salt, and bayleafs. Bring to a gentle boil.
Add potatoes. Cook 12 minutes.
Carefully whisk in egg mixture and brick cheese.
Layer in casserole dish: 1/2 potatoes, onion/pepper mixture, sausage, and top with remaining potatoes.
*Remove bay leafs
Bake at 350 degrees for 50 minutes covered.
Remove from oven. Place 3 sliced tomatoes on top. Sprinkle with cheddar cheese and remaining cornflakes.
Bake another 5 minutes.
Yield: 8 servimgs