Greater Midwest Foodways Alliance
FAMILY HEIRLOOM RECIPES
Contestants entered their best scratch family heirloom recipe suitable for a family or community dinner. Recipe should originate before 1950.
Contestants brought a prepared dish along with a brief story of who passed the recipe down to them, ethnicity, if relevant, number of years the recipe has been in their family and any interesting information about their recipe.
JUDGING CRITERIA
Taste: 50%
History: 40%
Appearance: 10%
Premiums sponsored in partnership with Feedstuffs FoodLink.com

1st place – $150., 2nd place – $100., 3rd place – $50

Pampered Chef is sponsoring additional prizes for our winners:
First place: Reversible Bamboo Carving Board (Value = $72)
Second place: Cool & Serve Square Tray, Outdoor Mini Spoons & Tongs Set (Value = $49)
Third place: Food Chopper (Value = $31)
Competition was conducted on August 19th, these are the results:
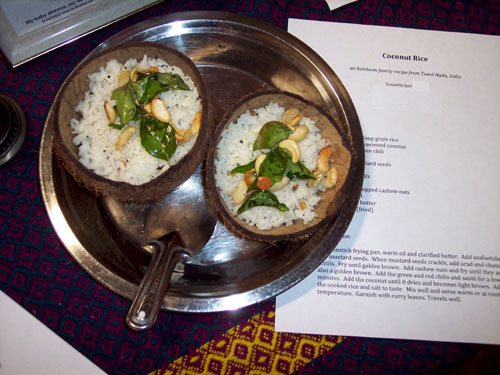
Coconut Rice (Image by Wanda Bain)
First Place
Coconut Rice
an heirloom family recipe from Tamil Nadu, India
Vasanthi Iyer, Brooklyn Park, Minnesota
Coconut rice is a simple dish that highlights the staples of a South Indian kitchen. The main ingredients can be found in any South Indian home. I can trace the provenance of our family’s recipe to my greatgrandmother Savithri, who is the namesake of my mother and my granddaughter.
Coconut rice also plays a significant role in the culture of Tamil Nadu, my native state. The Cauvery River is the state’s largest river, and it rises during the Tamil month of Adi, which lasts from July 15 to August 15. During this time, the Cauvery embodies a pregnant woman whose cravings must be satisfied. Therefore, Tamilian families prepare coconut rice, leave it on the riverbanks, and pray for the river’s sustenance during the coming year.
Here in Minnesota, we are thousands of miles from the Cauvery, but coconut rice still plays an important role in the culture of my family. When my children were younger, coconut rice was a ubiquitous part of family road trips. Whether we were in a national park or in a new city, I was always armed with paper plates, plastic forks, and a container of coconut rice. And last year, I finally had the opportunity to prepare coconut rice for my daughter’s baby shower, just as my mother had done for me. I now look forward to the day when my granddaughter can enjoy this part of her culinary heritage.
Coconut Rice
an heirloom family recipe from Tamil Nadu, India
Vasanthi Iyer, Brooklyn Park, Minnesota
Ingredients
2 cups of cooked long-grain rice
1 1/2 c. grated unsweetened coconut
1 tsp. chopped green chili
1/2 dry red chili
1 1/2 tsp. black mustard seeds
2 tsp. urad lentils
2 tsp. channa lentils
1/4 tsp. asafoetida
1/4 to 1/2 cup of chopped cashew nuts
2 tbsp. canola oil
2 tbsp. clarified butter
8 curry leaves (fried)
salt to taste
Preparation:
In a nonstick frying pan, warm oil and clarified butter. Add asafoetida and mustard seeds. When mustard seeds crackle, add urad and channa lentils. Fry until golden brown. Add cashew nuts and fry until they are also a golden brown. Add the green and red chilis and saute for a few minutes. Add the coconut until it dries and becomes light brown. Add the cooked rice and salt to taste. Mix well and serve warm or at room temperature. Garnish with curry leaves. Travels well.
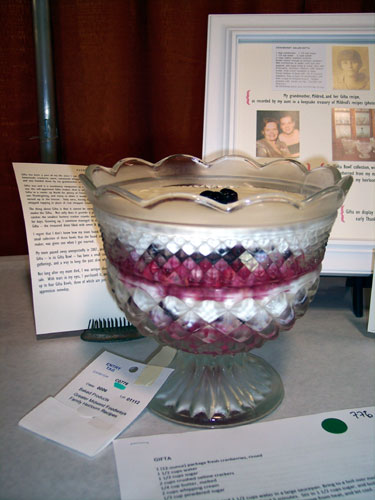
Gifta (Image by Wanda Bain)
Second Prize
GIFTA
Alyssa Porubcan, Plymouth, Minnesota
Gifta has been a part of my life since I can remember. This simple, albeit strange-sounding combination of homemade cranberry sauce, sweetened whipped cream, and buttery saltine crackers is Scandinavian in origin, and was handed down by my grandmother to my mom.
Gifta was and is a mandatory component at every holiday gathering during cranberry season, and my mom was the self-appointed Gifta maker, that is until I turned old enough to become her apprentice. We lugged Gifta in a cooler up North for plenty of Christmases, it made an appearance in Birmingham, Alabama for one Thanksgiving, and every so often it would show up for Easter when a leftover package of fall cranberries turned up in the freezer. Only once, during the fat-free craze of the early 90s, was Gifta made with whipped topping in place of real whipped cream (and never again!).
The thing about Gifta is that it cannot be served in anything other than a ‘Gifta Bowl.’ The Gifta Bowl makes the Gifta. Not only does it provide a pretty presentation, it contains ‘the divet,’ a small crevice that catches the smallest buttery cracker crumbs and allows them to soak in a pool of sweetened cranberry juice for days. Growing up, I somehow managed to always appear in the kitchen when the last bit of leftover Gifta – the treasured divet filled with sweet & salty cracker goodness – was about to be served up.
I regret that I don’t know how my mom found the original Gifta Bowl, but I do know she ended up with a small collection of these bowls that she found at antique stores over the years. I, as the heir-apparent Gifta maker, was given one when I got married.
My mom passed away unexpectedly in 2007, and for all the changes that have happened since her death, Gifta – in its Gifta Bowl- has been a small comfort & thread of constancy at the new version of family gatherings, and a way to keep the past alive while moving ahead into the future.
Not long after my mom died, i was antique shopping in my hometown and came upon a Gifta Bowl for sale. With tears in my eyes, I purchased it, and that became the beginning of my own collection. I’m now up to four Gifta Bowls, three of which are just waiting to become wedding gifts for my own Gifta apprentices someday.
GIFTA
Alyssa Porubcan, Plymouth, Minnesota
1 (12-ounce) package fresh cranberries, rinsed
1 1/2 cups water
1 1/2 cups sugar
2 cups crushed saltine crackers
1/4 cup butter, melted
2 cups whipping cream
1/3 cup powdered sugar
Combine cranberries and 1 1/2 cups water in a large saucepan. Bring to a boil over medium heat; boil until cranberry skins have popped, about 5 minutes. Stir in 1 1/2 cups sugar, and boil, uncovered, 5 minutes. Cover, and boil an additional 8 minutes. Remove from heat, and let cool. Chill cranberry sauce overnight.
Stir together crushed saltine crackers and melted butter until well combined.
Beat whipping cream and 1/3 cup powdered sugar until stiff peaks form. Add additional sugar, to taste, if desired.
Reserve a few whole cranberries from chilled cranberry sauce for a garnish, if desired. In a large trifle bowl, layer half of the buttered cracker mixture, half of the cranberry sauce, and half of the sweetened whipped cream. Repeat layers, ending with the remaining whipped cream.
Garnish with reserved cooked cranberries, if desired. Cover, and refrigerate 8 hours or overnight.
Third Prize
Grandma Eva’s Kransekake
Kristen Wollin, Minneapolis, Minnesota
A Kransekake is an almond-flavored cake of Norwegian and Danish origin that is served at special occasions. While the ingredients are simple (almond paste, egg whites and powdered sugar), the presentation is striking. The dough is squeezed from a pastry bag into molds forming 18 concentric circles. After baking, the rings are stacked on top of each other starting with the largest on the bottom. The name translates to “wreath cake” and is typically served at weddings, but is also enjoyed at holidays, baptisms, graduations and anniversaries.
My maternal grandmother, Eva, started making kransekakes about 30 years ago. A talented and prolific baker in her own right, Grandma Eva learned this recipe from a cousin that had immigrated to Minnesota from Norway in the 1950s. Grandma Eva still uses the same recipe today, making 15-20 cakes each year. While there are others in our extended family that make kransekakes, Grandma Eva’s is renowned and I’ve personally witnessed episodes of her cake being hoarded by fervent fans at various family functions.
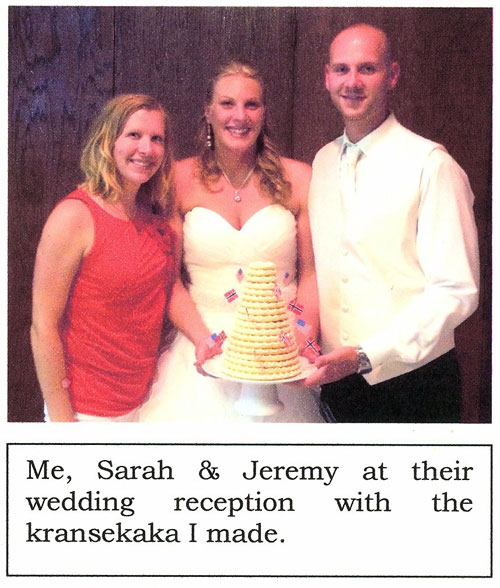
The catalyst for me to finally learn how to make kransekake came from some friends that recently got married. They are both of Norwegian descent and the bride had discovered the delicacy while completing her student teaching in Norway. It was a perfect convergence of her desire to have a kransekake at their wedding and my interest in learning this family tradition. Needless to say, Grandma Eva was thrilled as was the couple on their wedding day.
I’m very excited to continue this family tradition. Grandma Eva’s kransekake is just one of her many legacies I hope to carry forward.
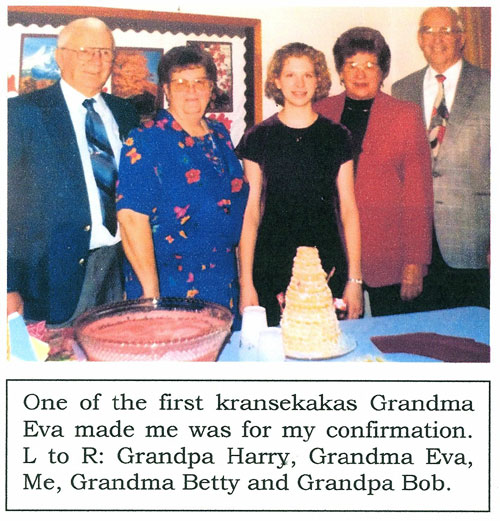
One of the first kransekakas Grandma Eva made me was for my confirmation.
Grandma Eva’s Kransekake
Kristen Wollin, Minneapolis, Minnesota
4 egg whites
2 lbs. almond paste
1 1/2 cups powdered sugar
Beat the eggs in a standing mixer until frothy. Add almond paste, a little at a time, until blended together. Add powdered sugar. Dough will be soft and sticky.
Place dough in a 12-inch pastry bag with a No. 4B tip. Do not refrigerate; use immediately. Grease kransekake molds generously and dust with flour. Squeeze dough into the rings and bake at 350 degrees for 10-15 minutes or until light golden brown. Let rings cool completely and remove from molds. Build kransekake by starting with the largest ring on the bottom, second largest on top of that and so on. Pipe loops of icing (recipe follows) on each ring as you stack it. Serve by removing the bottom rings one at a time.
Icing: Stir together 1 1/2 cups of powdered sugar, 1 egg white, 1 teaspoon of white vinegar and 1 teaspoon of almond extract.

Three Day Buns (Image by Wanda Bain)
Fourth Prize
Three Day Buns
Elizabeth Paetow, Montrose Minnesota
My paternal grandmother grew up with these buns. The recipe has to be at least 100 years old. They actually did take three days to make. The yeast was not as strong and they let them rise more times that we do now.
I grew up going to my grandmother’s house and the first thing my brothers and I would do, would be to look for the big blue canner. It was always filled to the brim with fresh baked buns. We would eat the first one plain then graduate to butter and fresh strawberry jam. My uncle taught us to just poke a hole in the bun and fill it with jam and eat them that way. My mother learned how to make them also and they tasted just like grandmas but she usually made big batches of bread instead. I think it was easier for her with working outside the home and 4 children.
I watched my grandmother do a lot of cooking and baking and learned quite a bit from her. When I got married I requested my grandmother make them for my reception. I never did make these buns with her but did get the recipe when I was in my 20’s. I watched her make these buns many times and learned how to form them by watching her. When she did not want to be responsible for making them any longer for family events, it became my responsibility.
I really can brag that the first time I made them they tasted just like hers. Not everyone can shape them properly, it takes practice. The recipe makes a large batch but I have never cut it down. It makes 5 dozen and they don’t last long when you have a big gathering.
They are a family favorite and now my daughter, nephew and niece all want to learn how to make them.
Three Day Buns
Elizabeth Paetow, Montrose Minnesota
Start the process at 3:00 in the afternoon previous to the day you want the buns.
Make a sponge with 1 and 1/2 cups warm water (110 degreesF/45 degrees C), 1 teaspoon sugar, two tablespoons yeast and 2 cups flour. Mix well and let rise for 1/2 hour.
Add:
2 cups cold water
1 cup sugar
1/2 cups Crisco
2 large eggs
1 1/2 tablespoons salt
Add 12-14 cups of bread flour 2 cups at a time and knead until you have a hard dough, this process takes about 8-12 minutes. Place in a large greased bowl and let rise until 6:00 p.m. Punch dough down and let rise until 9-9:30 pm.
Grease 5 cookie sheets. Make into 5 dozen buns. Cover with dish towels and let rise overnight. Heat oven to 350. Should start baking by 7:00 am. Bake one dozen at a time for 10-12 minutes or until nicely golden brown. Remove to cooling rack and enjoy.