Greater Midwest Foodways Alliance
FAMILY HEIRLOOM RECIPES
Contestants entered their best scratch family heirloom recipe suitable for a family or community dinner. Recipe should originate before 1950.
Contestants brought a prepared dish along with a brief story of who passed the recipe down to them, ethnicity, if relevant, number of years the recipe has been in their family and any interesting information about their recipe.
JUDGING CRITERIA
Taste: 50%
History: 40%
Appearance: 10%
Premiums sponsored in partnership with Feedstuffs FoodLink.com

1st place – $150., 2nd place – $100., 3rd place – $50

Pampered Chef is sponsoring additional prizes for our winners:
First place: Reversible Bamboo Carving Board (Value = $72)
Second place: Cool & Serve Square Tray, Outdoor Mini Spoons & Tongs Set (Value = $49)
Third place: Food Chopper (Value = $31)
Competition was conducted on September 7th, these are the results:
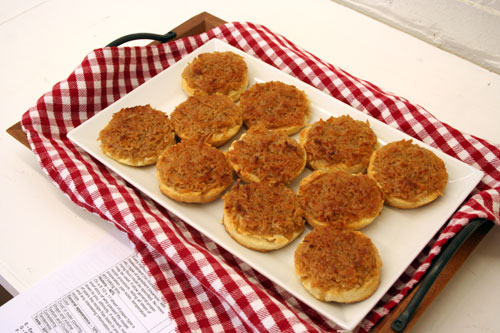
Coconut Toast (Image by Karen Keb Will)
Coconut Toast
Denise Pounds, Hutchinson, Kansas
Coconut Toast has become a treasured recipe that has become one of our family’s favorites. The tradition started with my husband’s family. He urgently requested, early in our marriage, that I spend some time with his mother learning how make his favorite treat. This is the recipe that she learned from her mother-in-law:
Equal amounts of butter, brown sugar, “Pet” milk, and a whole lot of coconut. Cook it for a while, then spread it on toast. Toast it under the broiler till it’s brown and bubbly. Then call the boys to breakfast!
I’ve had to record some specific measurements so that I could pass the tradition to my daughter and her family. We enjoy spreading the rich coconut topping on our favorite biscuits. I tried tweaking the topping recipe a few times and was lovingly told “just leave it alone. You just don’t mess with perfection.”
I asked my husband to share some of his memories of his mother’s coconut toast. He smiled warmly and his eyes softened as he shifted his thoughts down memory lane:
When Mom made Coconut Toast on bread we would easily polish off a at least a half a loaf at a time. My favorite pieces were the ones that didn’t get cooked all the way. They would be all ooey and gooey. Mom would wake us boys to get ready for school. As I was walking down the hall I could smell that she was making Coconut Toast. My brothers and I would race to the table to be the first to pick the gooey pieces. When we make Coconut Toast for our kids it always made me think of Mom.
We’ve taken our recipe treasure to carry-in dinners and brunches. We’ve enjoyed fond memories when we share it at family reunions. We want to share our family favorite with you.
Toasted Coconut on Biscuits
Denise Pounds, Hutchinson, Kansas
(makes 18 servings)
Light-as-a-Feather Cream Biscuits:
3 1/2 cups self-rising flour
1/2 cup cornstarch (this will lower the protein in the flour for a tender biscuit)
4 teaspoons sugar
2 3/4 to 3 1/4 cups heavy cream, enough to make a cohesive dough
Whisk together the flour, cornstarch, and sugar. Stir in enough heavy cream to moisten the dough thoroughly. You want to be able to gather the dough together, squeeze it, and have it hang together easily, without dry bits falling off.
Turn the dough out onto a lightly floured work surface, and very gently pat it into a piece about 3/4″ thick. Use a sharp 3″ biscuit cutter to cut rounds. Place them on a parchment-lined baking sheet. Place the pan in the freezer for 30 minutes. This will improve the biscuits’ texture and rise. Preheat the oven to 425°P while the biscuits are in the freezer. Bake the biscuits for 20 minutes, till they’re golden brown. Remove from the oven.
Coconut Topping:
1 cup butter
1 cup brown sugar
1 cup canned evaporated milk
4 cups shredded sweetened coconut
Warm butter in a medium-sized regular (shiny bottom, not non-stick) saucepan over medium heat. Cook butter until it starts to smell nutty and brown bits form at the bottom of the pan, this takes about 6-9 minutes. Just as it starts to brown, add the brown sugar. Stir until it is melted and smooth, but still seperated. Whisk in evaporated milk. As the mixture begins to simmer addd coconut. Stir and simmer for about 5 minutes. Set aside until ready to top the biscuits.
Break the biscuits apart. Spread a generous amount of coconut topping on each open half of the biscuit. Place on a cookie sheet. Toast the coconut topping under the broiler in the oven until the tops get browned and bubbly. Keep any leftover coconut topping in the freezer to easily defrost for a quick treat.
Enjoy with family and share with friends!
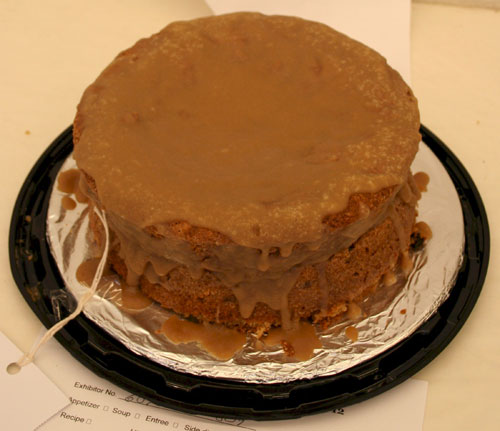
Grandpa Slawson’s Buttermilk Cake (Image by Karen Keb Will)
GRAMPA SLAWSON’S BUTTERMILK CAKE
Barbara Say, Emporia, Kansas
2 cups sugar
1/2 cup lard*
1 teaspoon salt
2 cups buttermilk
2 teaspoon soda
1 cup raisins
3 cups flour (pinch of baking powder)
1 teaspoon cinnamon
1 teaspoon cloves
1 teaspoon nutmeg
Cream * (I use shortening) and sugar together
Mix all dry ingredients together
Alternate with buttermilk add dry ingredients to creamed sugar.
Mix well stirs in raisins
Bake in 2 greased round pans 350 for 40 to 45 min.
Remove from pans while still very warm
Frosting
Bring to boil 6 tablespoons butter
1 tablespoon milk
3/4 cup brown sugar
Boil 1 min
While cake is still warm
Place on cake plate bottom layer
Pour have of frosting over bottom layer
Place on top layer pour on rest of frosting.
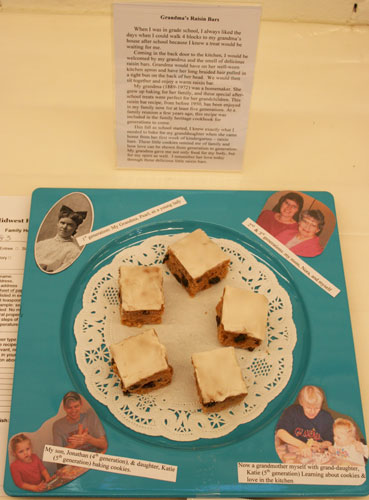
Grandma’s Raisin Bars (Image by Karen Keb Will)
Grandma’s Raisin Bars
Joyce Conard, Hutchinson, Kansas
When I was in grade school, I always liked the days when I could walk 4 blocks to my grandma’s house after school because I knew a treat would be waiting for me.
Coming in the back door to the kitchen, I would be welcomed by my grandma and the smell of delicious raisin bars. Grandma would have on her well-worn kitchen apron and have her long braided hair pulled in a tight bun on the back of her head. We would then sit together and enjoy a warm raisin bar.
My grandma (1889-1972) was a homemaker. She grew up baking for her family, and these special after-school treats were perfect for her grandchildren. This raisin bar recipe, from before 1950, has been enjoyed in my family now for at least five generations. At a family reunion a few years ago, this recipe was included in the family heritage cookbook for generations to come.
This fall as school started, I knew exactly what I needed to bake for my granddaughter when she came home from her first week of kindergarten – raisin bars. These little cookies remind me of family and how love can be shown from generation to generation. My grandma gave me not only food for my body, but for my spirit as well. I remember her love today through these delicious little raisin bars.
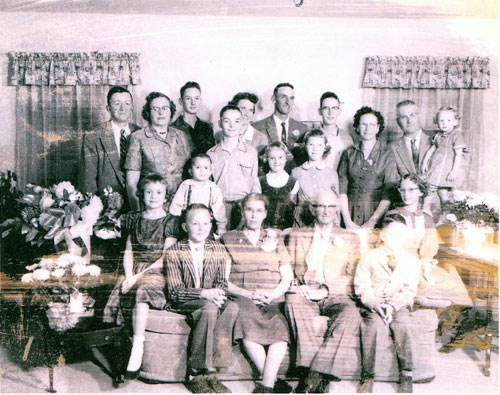
This 50th wedding anniversary picture shows my Grandma and Grandpa with all their children and grandchildren.
Grandma’s Raisin Bars
Joyce Conard, Hutchinson, Kansas
Ingredients
1 C. raisins
2 C. water
1 C. sugar
1/2 C. shortening
2 C. flour
1/2 t. baking soda
1 t. cinnamon
1/4 t. salt
Directions
Cook 1 C. raisins in 2 C. water until 1 C. water remains.
Cream sugar and shortening.
Sift together flour, soda, cinnamon, and salt.
Alternately add dry ingredients and raisin mixture to creamed mixture, [mixing each time].
Bake in a shallow pan (round cake pan may be used) about 25 minutes at 350 degrees.
Spread with powdered sugar frosting* while warm and cut right away.
[*One cup powdered sugar. 1 T. milk, 1/4 t. Vanilla extract.
Combine ingredients; mix well, adding additional milk as needed until desired spreading consistency is achieved.]
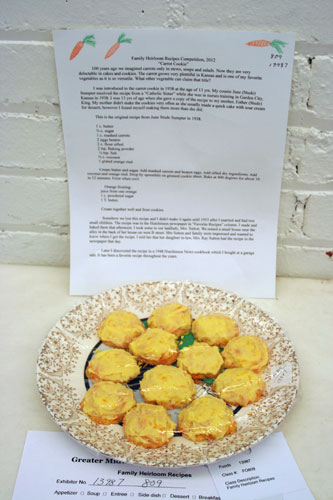
Carrot Cookies (Image by Karen Keb Will)
Carrot Cookie
Ruth Cramer
100 years ago we imagined carrots only in stews, soups and salads. Now they are very delectable in cakes and cookies. The carrot grow very plentiful in Kansas and is one of my favorite vegetables as it is so versatile. What other vegetable can claim that title?
I was introduced to the carrot cookie in 1938 at the age of 13 yrs. My cousin June (Stude) Sumpter received the recipe from a “Catholic Sister”while she was in nurses training in Garden City, Kansas in 1938. I was 13 yrs of age when she gave me a copy of the recipe to my mother, Esther (Stude) King. My Mother didn’t make the cookies very often as she usually made a quick cake with sour cream for dessert, however I found myself making them more than she did.
This is the original recipe from June Stude Sumpter in 1938.
Carrot Cookie
Ruth Cramer
1 c. butter
3/4 c. sugar
1 c. mashed carrots
2 eggs beaten
2 c. flour sifted
2 tsp Baking powder
1/3 tsp. Salt
¾ c. coconut
1 grated orange rind
Cream butter and sugar. Add mashed carrots and beaten eggs. Add sifted dry ingredients. Add coconut and orange rind. Drop by spoonfuls on greased cookie sheet. Bake at 400 degrees for about 10 to 12 minutes. Frost when cool.
Orange frosting:
Juice from one orange
1 c. powdered sugar
1 T. butter
Cream together well and frost cookies.
Somehow we lost this recipe and I didn’t make it again until 1953 after I married and had two small children. The recipe was in the Hutchinson newspaper in “Favorite Recipes” column. I made and baked them that afternoon. I took some to our landlady, Mrs. Sutton. We rented a small house near the alley in the back of her house on west B. street. Mrs. Sutton and family were impressed and wanted to know where I got the recipe. I told her that her daughter-in-law Mrs. Ray Sutton had the recipe in the newspaper that day.
Later I discovered the recipe in a 1948 Hutchinson News cookbook which I bought at a garage sale. It has been a favorite recipe throughout the years.
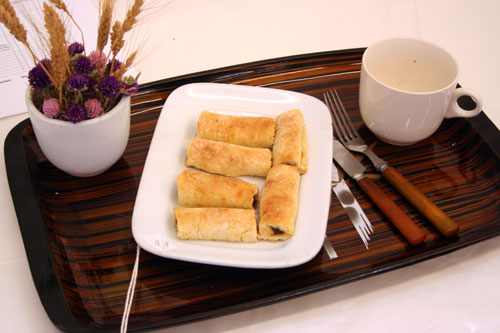
Raisin Schnecka (Image Karen Keb Will)
Raisin Schnecka (Lady Fingers)
Linda Pauls, Buhler, Kansas
This is a recipe, we used many times. My Mother would often make “Schnecka” (minus the raisins) for a quick bread at supper, especially if the home-made bread was gone. They were so good with a little butter and lots of jam or jelly.
Then for a dessert special, Raisins were used-cooked and used as a filling. Follow as per recipe.
The grandparents on Dad’s and Mother’s side, all came from Russia by boat in 1884, taking them over a month to get here. These recipes were passed down to my parents. Later, Mother wrote them down for me.
The Schnecka were also good for coffee breaks, taken to the fields for a mid-morning snack and also in the afternoon around 3:30-to 4:00 oclock. They always looked forward to that; coffee and water were taken in glass jars.
I do not have the original recipe, it was just jotted on a scrap bit of paper. Many recipes they knew for memory. Mother gave and taught me how to make them in 1940’s.
May enjoy them also.
Raisin Schnecka (Lady Fingers)
Linda Pauls, Buhler, Kansas
Raisin Filling
1 1/4 cups raisins
1 cup water
¼ cup sugar
2 tablespoons flour
1 tablespoon butter
1/2 teaspoon vanilla
I do the raisin filling first because it has to cool. Boil the raisins and water for a few minutes. Mix the sugar and flour, add 2 tablespoons of water and add to the boiling raisins, stirring until thickened. Remove from heat add butter and vanilla. Cool.
Dough
1 cup Evaporated milk
1/2 cup buttermilk
1/3 cup each of butter and Crisco
4 teaspoons Baking powder
1/2 teaspoon baking soda
2 teaspoons sugar
1 teaspoon salt
4 cups all-purpose flour
In a small bowl combine the milk’s: set aside. In a larger bowl, mix all dry ingredients. Cut butter and Crisco into the flour mixture. Add milk and stir with a fork until you have a soft dough. The less you work the dough, the flakier it will he. Take 1/2 of the dough, roll out on a lightly floured board to 1/4 inch thick. Cut a straight line across the bottom of dough along the edge. Spoon a narrow strip of raisin filling along the dough and roll, lap over twice. Cut along the fold. Place the rolls of dough seam side down on a parchment lined baking pan. Bake in a preheated 400 degree oven for 15 minutes or until nicely browned. Cut into 2 1/2 to 3 inch lengths after it has cooled a little. Continue to cool on wire rack. Makes 36 rolls. It depends on how wide you roll the dough.
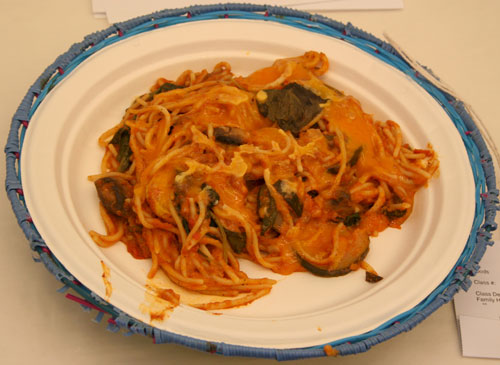
Live Longer Casserole (Image by Karen Keb Will)
LIVE LONGER CASSEROLE
J. T Hines, Hutchinson, Kansas
HISTORY:
This recipe originated from my great grandmother who developed it on her farm in north east Nebraska during the depression. She used to make this using chicken, but since she wanted to keep her chickens alive to lay eggs, she substituted mushrooms for the chicken which made this a totally vegetarian dish. Every ingredient in the dish she grew in her garden and the mushrooms she grew in her fruit cellar. She even made her own noodles and cheese.
She coined the term “live longer casserole” because she joked the chickens got to “live longer”
whenever she made it.
Her dish was a huge hit at church socials and “hay mows” where all the area farm families got together to cut and put up hay. It was passed down from her to my grandmother down to my mother and then to me and the meaning has morphed from the chickens living longer to whoever eats it lives longer. Since it is a vegetarian dish it had a resurrection during the sixties and I’ve seen variations of it pop up here and there. But nothing comes close to great granny Jane’s original Live Longer Casserole. Here it is.
LIVE LONGER CASSEROLE
J. T Hines, Hutchinson, Kansas
INGREDIENTS:
1 1/2 cups sliced zucchini
1 1/2 cups sliced yellow squash
1 1/2 cups sliced fresh mushrooms
3 sliced tomatoes
8 cloves garlic
1 package spaghetti
1 package fresh spinach
1/2 cup fresh basil
1/4 cup fresh chopped oregano
1 large can tomato sauce
1 lb. sharp cheddar cheese
1/4 cup parmesan cheese
1/4 cup olive oil
PREPARARTION:
Pre heat oven to 350 degrees
Sautee in olive oil for 5 minutes each: first squash, then mushrooms and garlic and then tomatoes.
Meanwhile cook spaghetti as per instructions and drain. Shred cheddar cheese.
Steam spinach and set aside.
Add tomato sauce to sauteed vegetables along with chopped herbs. Simmer for a few minutes on low heat.
Toss in cooked spaghetti then add steamed spinach.
Toss in 1/2 lb. cheddar along with parmesan and simmer until melted
Transfer all ingredients to large greased casserole dish.
Top with remaining cheddar cheese and bake for 30 minutes
Sprinkle parmesan over top then serve
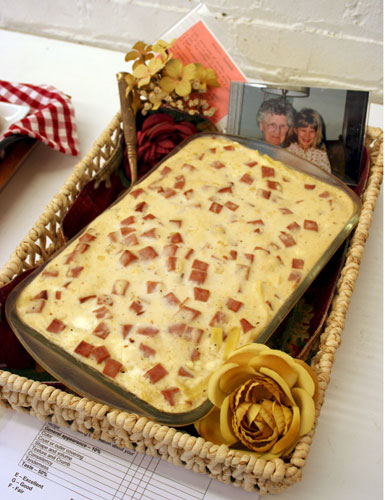
Verenike Casserole (Image by Karen Keb Will)
What Verenike Casserole means to me
Lisa Hagley, Hutchinson, Kansas
I choose a verenike casserole recipe as my family heirloom recipe for several reasons. Verenike has long been a favorite in my family. My daughter and I go to my grandmother’s house every November and prepare up to 80 verenike for our Christmas family gathering. We make ahead of time and put them in the freezer for the big day. The half circle cottage cheese filled pockets smothered with ham gravy is served every Christmas gathering in our family. The casserole however is a very easy recipe that provides the same authentic taste as original verenike. Verenike is served in many German and Mennonite gatherings. It’s sold yearly around our town of Hutchinson at Central Christian and the MCC Sale. The casserole however provides not only a quick meal resembling the same flavors but also feeds a crowd of people. I have brought verenike casserole to many family and community dinners and provided it for my daughter’s volleyball team just last night. They loved it and came back for more! The original recipe I have was given to me by my grandmother on an index card. She used a typewriter and typed on orange paper and glued to the card … just another reason this recipe is special and an heirloom in my family. I have changed a few things from her original recipe such as using precooked frozen egg noodles … but one thing remains the same, the last sentence she typed is GOOD EATING!! I agree and hope you do too!
Verenike Casserole
Lisa Hagley, Hutchinson, Kansas
1 pkg. precooked frozen egg noodles (12 oz.)
1 pkg. dry cottage cheese
2 eggs
1 t. salt
1 t. pepper
1 c. sour cream
Gravy:
2 c. cubed ham
2 T. butler
2 c. milk
1 c. half and half
2 T. flour
2 T. sour cream
Spray a 9 x 13″ pan. Preheat oven to 350 degrees. Cook noodles according to package (I use precooked and they cook in 5 minutes but any noodles will work).
Mix together cottage cheese, eggs and salt and pepper. In pan layer noodles then cheese mixture
and repeat. Spread the sour cream on top. Cover with ham gravy and bake 30-40 minutes.
Gravy: Saute ham in the butter. In separate bowl whisk flour and milk and pour slowly into the
ham stirring constantly. As it thickens add half and half. Stir in sour cream and remove from heat.
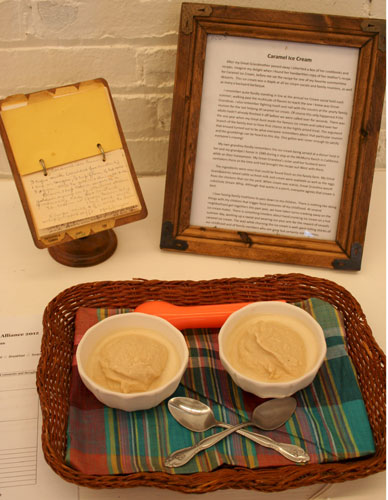
Caramel Ice Cream (Image by Karen Keb Will)
Caramel Ice Cream
Heather Britain
After my Great-Grandmother passed away I inherited a box of her cookbooks and recipes. Imagine my delight when I found her handwritten copy of her mother’s recipe for Caramel Ice Cream, before me sat the recipe for one of my favorite summertime desserts. The ice cream was a staple at all ice cream socials and family reunions, as well as many a backyard barbeque.
I remember quite fondly standing in line at the annual ice cream social held each summer, walking past the multitude of flavors to reach the one I knew was Great Grandmas. I also remember fighting tooth and nail with the cousins at the yearly family reunion for the last helping of caramel ice cream. Of course this only happened if the adults hadn’t already finished it off before we were called over for seconds. There was one year when Great Aunt made the famous ice cream and called over her branch of the family tree to have first chance at the highly prized treat. The argument that ensued turned out to be what everyone remembers about that particular reunion and the grumblings can heard to this day. One gallon was never enough to satisfy everyone’s craving!
My own grandma fondly remembers this ice cream being served at a dinner held in her and my grandpa’s honor in 1949 during a stop at the McMurry Ranch in California while on their honeymoon. My Great-Grandma’s sister and her husband were caretakers there at the time and had brought the recipe out West with them.
The ingredients were ones that could be found fresh on the family farm. My Great Grandparetns raised cattle so fresh milk and cream were available as well as the eggs from the chickens that ran the yard. When cream was scarce, Great Grandma would substitute Dream Whip. Although it works in a pinch, everyone agrees that cream is best.
I love have family traditions to pass down to my children. There is nothing like doing things with my children that trigger fond memories of my childhood. At several neighborhood get-togethers this past year, we have taken turns cranking away on the ice cream maker. There is something timeless about hand cranking ice cream on a hot summer day, working up a sweat and wearing out your arm for the reward of smooth caramel ice cream. The wait while churning the ice cream is well spent telling stories of our childhood and of family members who are gone but certain not forgotten.
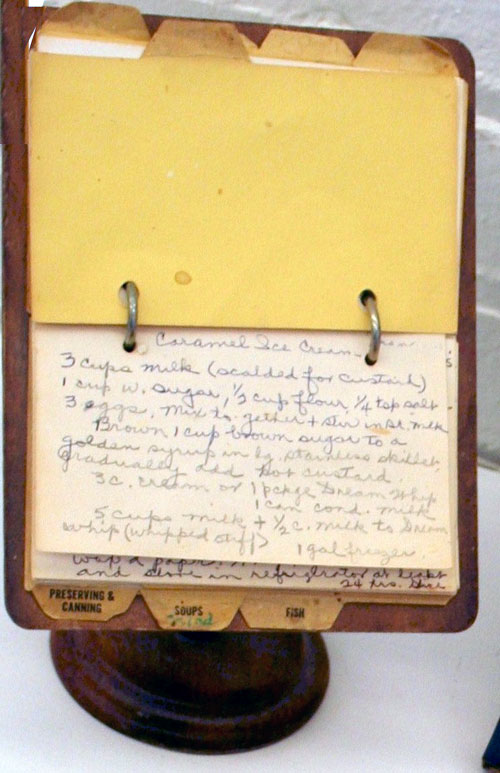
Caramel Ice Cream Recipe (Image by Karen Keb Will)
Caramel Ice Cream
Heather Britain
3 cups milk (scalded for custard)
1 cup w. sugar
1/2 cup flour
1/4 tsp salt
3 eggs
Mix together + stir in hot milk.
Brown 1 cup brown sugar to a golden syrup in lg stainless skillet. Gradually add to hot custard.
3 c. cream or 1 pckge Dream Whip, 1 can cond. milk
5 cups milk to 1/2 c. milk to Dream Whip (Whipped stiff) 1 gal freezer