Greater Midwest Foodways Alliance
FAMILY HEIRLOOM RECIPES
Contestants entered their best scratch family heirloom recipe suitable for a family or community dinner. Recipe should originate before 1950.
Contestants brought a prepared dish along with a brief story of who passed the recipe down to them, ethnicity, if relevant, number of years the recipe has been in their family and any interesting information about their recipe.
JUDGING CRITERIA
Taste: 50%
History: 40%
Appearance: 10%
Competition was conducted on August 15th, these are the results:
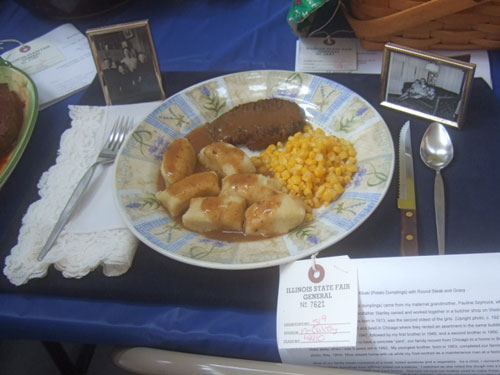
Kluski – Czech Potato Dumplings (Image by Peter Engler)
First prize
Kluski (Potato Dumplings) with Round Steak and Gravy
Caroline M. Becker, Springfield, Illinois
The recipe for the kluski (potato dumplings) came from my maternal grandmother, Pauline Szymura, who was Polish and German. She and my grandfather Stanley owned and worked together in a butcher shop on Western Avenue in Chicago. My mother, who was born in 1913, was the second oldest of the girls. (Upright photo, c. 1921) My parents were married in August, 1945 and lived in Chicago where they rented an apartment in the same building as my grandparents. I was born in 1947, followed by my first brother in 1949, and a second brother in 1950. Because my Dad didn’t want his children to have a concrete “yard”, our family moved from Chicago to a home in Berwyn, about 10 miles away, when I was 5 years old in 1952. My youngest brother, born in 1953, completed our family. (Horizontal photo, May, 1954) Mom stayed home with us while my Dad worked as a maintenance man at a factory.
Most of our family meals consisted of a meat, boiled potatoes and a vegetable. As a child, I remember my mother making these dumplings from leftover boiled red potatoes. I watched as she rolled the dough into a long, thin “snake” which she then cut into “pillows” that were boiled. She told me how her mother used to make these for her family when she and my aunts (c. 1920-30) were children living at home. Mom never measured anything for this recipe, but the kluski always seemed to turn out the same each time she made them. Prior to my marriage in 1968, I lived at home, didn’t cook much and certainly never attempted the recipe. But having round steak, gravy and kluski (along with canned corn) was a strong and favorite childhood memory, so I tried making them on my own. Since my Mom never measured any ingredients when she made them, she couldn’t provide much help. It took multiple efforts before I felt that I duplicated the product of my childhood memories! Eventually, I measured the ingredients and wrote the recipe in a cook book. Determining how to make the round steak was an easier task.
Although I never felt deprived as a child, there were not many extras in our family and I somehow knew that finances were tight. In the early years of my own marriage, however, when our finances were meager because my husband was in graduate school, I realized that making kluski helped stretch our limited resources because it turned a smaller amount of leftover potatoes into a larger quantity of dumplings that could feed a family for more meals. My Mom was obsessive about fairness, and each of us only got 4 kluski at a meal. I have always loved the taste and texture of the dumplings, particularly when combined with the round steak and gravy. Now that I have grandchildren of my own, my only son, his wife and our granddaughters have enjoyed them with us at family dinners. Hopefully, since the recipe is written down now, the tradition of the Polish kluski will be carried on for another generation.
Kluski (Potato Dumplings) with Round Steak and Gravy
Kluski Recipe
5 cups (lightly packed) cold boiled red potatoes
3 eggs
2 1/4 tsp. salt
3 1/2 cups flour
Peel and quarter 10-11 medium red potatoes and boil in salted water until they break easily when pierced with a fork. Drain and refrigerate overnight. Using a potato ricer or sausage grater, finely shred the potatoes. Measure 5 cups (lightly packed) potatoes, place in large bowl. Add eggs, salt and flour and mix by hand to form a soft but firm dough. Turn entire ball onto a large, generously floured surface, kneading for several minutes until the ball becomes smoother. Cut in half with a knife. Roll and shape each half, using your hands, to make a long, cylindrical “snake” about 1 1/4″ in diameter by 36″ long. Using a knife, cut into 1 – 1 1/4″ in sections. Bring 6 quarts water to a boil in a large pasta pot with a colander insert. Gently place the sections from the first half of dough in boiling water, stirring lightly to keep them from sticking during addition. Kluski will rise to surface and float in 5 minutes. Continue boiling for another 10-11 minutes, stirring occasionally. Drain in colander. Repeat process with second half of dough. Makes approximately 66 dumplings.
Round Steak and Gravy Recipe
2# tenderized round steak
8 slices bacon
1 tsp. tenderizer
1 tsp.salt
1/2 tsp. black pepper
1/8 tsp. sugar
1/4 tsp. garlic powder
5 tbsp. beef soup base (can substitute 5 beef bouillon cubes)
2 tsp. liquid hickory smoke
6 tbsp. flour and 1 cup water for gravy
Fry 8 slices bacon in a non-Teflon Dutch oven. While bacon is frying, season meat with tenderizer, salt, pepper, sugar and garlic powder. Remove bacon from pan and reserve for later use. Cut round steak into serving size portions (approx. 3″ x 4″), trimming excess fat. Brown round steak pieces in bacon fat, removing and reserving juices that accumulate during browning. Add enough water to reserved juices to equal 6 cups. Add beef soup base and hickory smoke to water. Continue browning round steak until very brown. Break bacon into smaller pieces and put on browned round steak. Add flavored water to pot (all meat should be covered) and simmer on very low heat for 3-4 hours until meat is very tender. Remove meat to serving platter.
Blend flour and 1 cup water in separate bowl. Pour into remaining juices in Dutch oven. Heat and stir until gravy thickens. Strain to remove any remaining pieces of shredded meat. Serve over kluski.
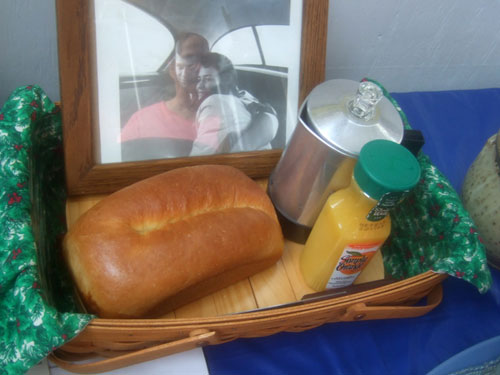
Potica (image by Peter Engler)
Second prize
Potica
Dianna Wara, Washington, Illinois
Oh my Gosh! I can remember walking into my grandma’s kitchen on Christmas morning to the smell of this wonder breakfast meal. Our traditional Christmas breakfast entree was this wonderful bread pronounced Poka-tiza. When it’s served warm, like my grandma did for Christmas, the filling just oozed on the plate. YUMMY! Grandma also served the Pokatiza with orange juice and coffee for the adults. My grandfather was Croatian and depending on which region you lived, the pronunciation, shape and flavors could vary. My grandma explained that it was a special bread made for special events only. Christmas was the special event in which my family made this bread. My grandmother taught my mother how to make this bread many years after she married my dad. I remember asking my grandma why she waited so long to teach my mom this bread. As grandma explained to me, she wanted to make sure she (my mom) was a keeper. Once grandma figured out that mom was a “keeper, she taught her the recipe. I’m glad that mom passed the test! Actually, my mom has been a “keeper” for 47 years so far.
When we no longer went to grandma’s for Christmas. My mom continued the family’s traditional Christmas breakfast. When mom bakes the Pokatiza, she bakes it the day before Christmas. So when we slice it on Christmas morning, the filling doesn’t ooze anymore. But, she taught us a trick to that. We just microwave the Pokatiza and we had the warm ooze of filling that we all know and love so much! And yes, she still serves it with orange juice and coffee. When my mom took over the baking of the Pokatiza, she decided to celebrate one other special day. That was on April 6th. That was the day that my mom and dad were married. It was another speical day that was celebrated with the Pokatiza. My mom in later years taught me how to make the bread and tradition continues.
I made this bread for you today, just as my mom does for our family. The walnuts that grandma used, were always picked from trees on her farm. My mom always uses walnuts that my dad has picked and cleaned from his farm. So, it is with great pride that I present this bread to you today, made from walnuts that my dad picked and clean, just for me.
Potica
2 to 2-1/2 cups all-purpose flour
1 package active dry yeast
1/3 cup milk
1/4 cup butter
2 tablespoons sugar 1/2 teaspoon salt
2 eggs
3 cups black walnuts, small chopped
2/3 cup brown sugar
1/4 cup honey
1 slightly beaten egg
3 tablespoons milk
1/2 teaspoon vanilla
1/4 cup butter
1 teaspoon ground cinnamon
1. In a bowl combine 1 cup of the flour and the yeast; set aside. In a saucepan heat the cup milk, butter, 2 tablespoons sugar, and salt just until warm (125 – 130 degrees F). Add to flour/yeast mixture. Then add 2 eggs. Beat with an electric mixer on low to medium speed for 30 seconds, scraping bowl. Beat on high speed for 3 minutes. Using a wooden spoon, stir in as much of the remaining flour as you can.
2. On a lightly floured surface, knead in enough of the remaining flour to make a moderately soft dough that is smooth and elastic (3 to 5 minutes total). Shape into a ball. Place dough in a greased bowl, turning once to grease surface. Cover and let rise in a warm place until double.
3. Meanwhile, for filling, mix walnuts, sugar, honey, remaining egg and milk and vanilla. Set aside.
4. Punch dough down. Cover and let rest 10 minutes. Grease two 9 X 5 loaf pans. On a lightly floured cloth, roll dough into a 15-inch square. Cover and let rest 10 minutes. Then roll dough into a 30×20-inch rectangle.
5. To assemble, cut dough lengthwise in half to form two 30×10-inch sheets. Spread the butter on top of both dough rectangles. Sprinkle the cinnamon on top. Spread walnut filling evenly on top of the dough, keeping to within 1 inch of the edges. Using the cloth as a guide, roll each rectangle up into a spiral, starting from a short side. Pinch seams and ends to seal. Place loaves, seam sides down, in the prepared pans. Mom and grandma would shape their like the letter “U” and then place it in the pan. Cover and let rise until nearly double (45 to 60 minutes).
6. Bake in a 325 degree F oven 45 to 50 minutes until bread sounds hollow when lightly tapped. If necessary, cover with foil the last 15 minutes of baking to prevent overbrowning. Remove from pans; cool. Makes 2 loaves.
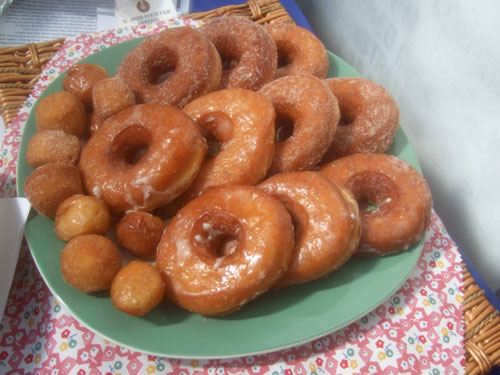
Grandmother Nickel’s Donuts (image by Peter Engler)
Third Prize
GRANDMOTHER NICKEL’S DONUTS
Jone Schumacher, Chapin, Illinois
The folks living in the little village of Concord in the 1930’s had most likely never had the delicacy of a donut until my grandmother, Sara Nickel, made them. My grandfather, Roy Nickel, produced Morgan-Scott Hybrid Corn and had a seed processing building outside Concord. My father and aunts tell me when Grandfather held an open-house field-day for his seed corn business, Grandmother made the donuts from scratch to serve the visiting farmers. Considering I awakened early in the morning to make one small batch of donuts for the fair, I wonder what time Grandmother rose to make the number needed to satisfy the hungry men. As a child, I do not remember the open house events, but I do recall the days Grandmother would make her unusual treat to take for morning breaks for the workers who did the hand grading and processing of the corn at the seed plant several tunes during the fall. I recall being thrilled when there were donuts “left over” to be enjoyed by the grandchildren for an after school treat, although I now realize Grandmother made an amount to assure there would be some left over. Grandmother’s donuts were the first and only donuts I recall eating as a child. I know donuts are very common and readily available today, but they were quite unusual, highly praised, and greatly looked forward to in the community of Concord.
I like my grandmother, love to bake and experiment in the kitchen. It is special for me to now have my Grandmother’s heirloom recipe as my aunt located it and gave me a photo copy in Grandmother’s own handwriting. Since Grandmother did not have in her recipe exactly the sugar coating, feel special being able to update her recipe from my aunt’s memory. Grandmother’s recipe did not specify they type of fat used for frying, but my father was very sure she would have had their own rendered lard to use which he believes added to the flavor. Since most people today do not perform the many hours of hard farm labor which helped to metabolize the animal fat, I choose to update my use of Grandmother’s recipe by choosing vegetable oil for health conscious folks of modern day.
I hope someday, my grandchildren will recall with fond memories the wonderful treat of their grandmother’s special homemade donuts I have made with love for them as much as I reminisce about my grandmother’s donuts. Even more, I hope my grandmother’s donut recipe will be handed down through the generations and that my daughters and granddaughters will have inherited our “culinary gene” to carry on the family donut tradition.
GRANDMOTHER’S YEAST DONUTS
1/2 cup butter
1 1/2 cup milk, divided
1/2 cup sugar
2 teaspoons salt
2 packages dry active yeast
1/2 cup lukewarm water
2 eggs beaten eggs
7 + cups flour
1. Sprinkle the yeast over the lukewarm water. Let rest until bubbly.
Combine the butter, sugar and salt in large mixing bowl. Scald 3/4 cup milk and pour over the sugar mixture. Stir until butter is melted. Stir in the remaining cold milk to cool mixture to lukewarm.
Stir in the yeast. Beat in the eggs.
Add flour gradually, stirring well until well blended. Continue to add flour until dough is stiff enough to turn out onto a floured board to knead.
Kneed for 5 minutes until dough is smooth and elastic.
Place in greased large bowl and cover with a clean dish towel and let rest in warm draft-free area for about an hour until doubled.
Punch down and let rest a few minutes before rolling out.
On floured board with rolling pen, roll dough to large rectangle about 1/2 inch thick. Cut with round biscuit cutter and cut out center with smaller cutter. Placed on greased tray, cover and let rise until doubled.
Heat fat to 375 degrees. With large spatula, lift raised dough and slide into hot fat. Fry on for approximately 2-3 minutes until golden brown. Turn over to fry to golden brown on second side. Lift from fat and drain.
Grandmother did not specify in her recipe what her sugar cinnamon or powdered sugar glaze was exactly, so I researched through my aunts and my father and thus adapted as close to their memory as possible and made this addition to her recipe.
Glaze:
2 tablespoons melted butter
1 1/2 cups powdered sugar
1/2 teaspoon vanilla
2-3 tablespoons milk
Sugar Cinnamon:
1/2 cup granulated sugar
1 teaspoon cinnamon
Combine ingredients of glaze and stir until well blended. Using a pastry brush, brush glaze on one side of warm donut; let set for a few minutes on wire rack. Brush the other side of donut and let rest to set.
Stir together the sugar and cinnamon. Place in small bowl. Place warm donut in to the sugar and turn to coat with the sugar.
Yield: 2 to 2-1/2 dozen medium sized donuts
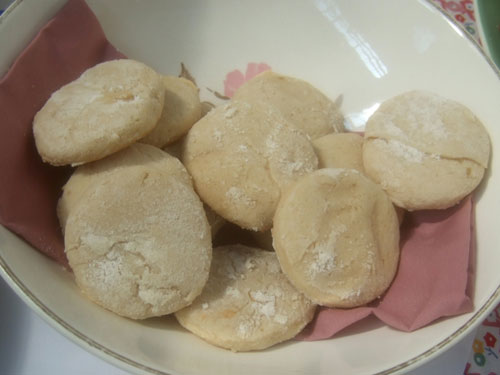
Great Great Grandma Rouch’s Brown Sugar Cookies (image by Peter Engler)
Honorable Mention
Great-Great Grandma Rouch’s Brown Sugar Cookies
Elizabeth Carter, Lincoln, Illinois
This recipe originated with my Great-Great-Grandmother, Ida Rouch and so it has been in the family for approximately 100 years. It was written down by my Great-Grandmother Irene Rouch (b. 1904 d. 2001) as a part of a cookbook that she made for her Grandchildren to share her favorite recipes, a copy of which was in turn passed down to me by my Mother. The Rouch’s were a farming family in Rural Indiana for generations. This recipe is closer to a biscuit than a traditional cookie and uses common farmhouse ingredients.
Great-Great Grandma Rouch’s Brown Sugar Cookies
2 cups brown sugar
1 cup shortening
2 eggs
1 cup buttermilk
2 tsp. Baking powder
1 tsp. Baking soda
Pinch of Salt (1/8 tsp. Salt)
Flavoring (2 tsp. Vanilla)
Flour to make a soft dough(4 cups all purpose flour)
Cream brown sugar and shortening, add beaten eggs and stir well. Add buttermilk and flavoring. Beat. Add baking powder and soda 2 cups of flour and stir into the mixture. Add more flour to make a soft dough(add remaining flour). Chill dough. Cut off portions of dough, roll out, cut into desired shapes. Place on cooky sheet. Bake in moderate oven (350 degrees F.) for perhaps 8 or 10 minutes.
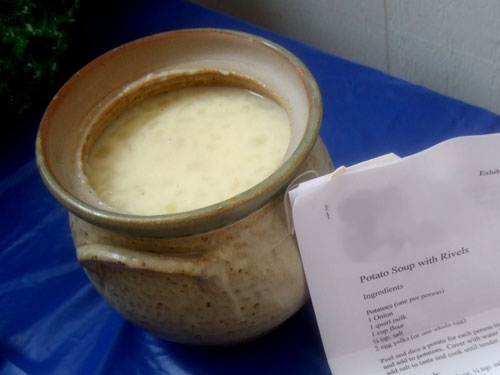
Potato Soup with Rivels (image by Peter Engler)
Honorable Mention
Potato Soup with Rivels
Darlene Crider, Lincoln, Illinois
The recipe for “Potato Soup with Rivels” was passed down to me by my grandmother, Wilma “Irene” Rouch (Grandma Rouch 1904-2001). She felt a strong desire to pass on her family history and made handwritten copies of her favorite recipes that she gave to her many grandchildren, particularly those recipes that had been in the family for a long time. This recipe was passed down to Grandma Rouch by her mother, Flora Hershberger Johnston. Grandma Rouch grew up in Grass Creek, Indiana, where she and her husband Lester Rouch, raised 5 children. She was always very proud of her husbands Pennsylvania Dutch heritage, but her ancestry, as we discovered after her death, was Black Irish on her fathers side and Pennsylvania Dutch on her mothers side. They were hardworking farm folk and this recipe was perfect for filling up hungry children on a cold winter’s day. It also adapts well today with the addition of ham, chicken broth or vegetables, like carrots and celery.
Potato Soup with Rivels
Potatoes (one per person)
1 Onion
1 quart milk
1 cup flour
1/4 tsp. salt
2 egg yolks (or one whole egg)
Peel and dice a potato for each person to be served. Peel and dice an onion and add to potatoes. Cover with water in a large pot with a heavy bottom, add salt to taste and cook until tender. Add 1 quart milk. Heat slowly.
To make rivels:
Stir together 1 cup flour, 1/4 tsp. salt and 2 egg yolks (or one whole egg) with fork until it forms little balls.
Add to potato soup, stirring all the time. Cook slowly on low heat until rivels are tender.
Add 3- 4 Tbsp. butter and pepper to taste.